Creating layout template in InDesign
At the beginning, it is important to define basic InDesign setup.
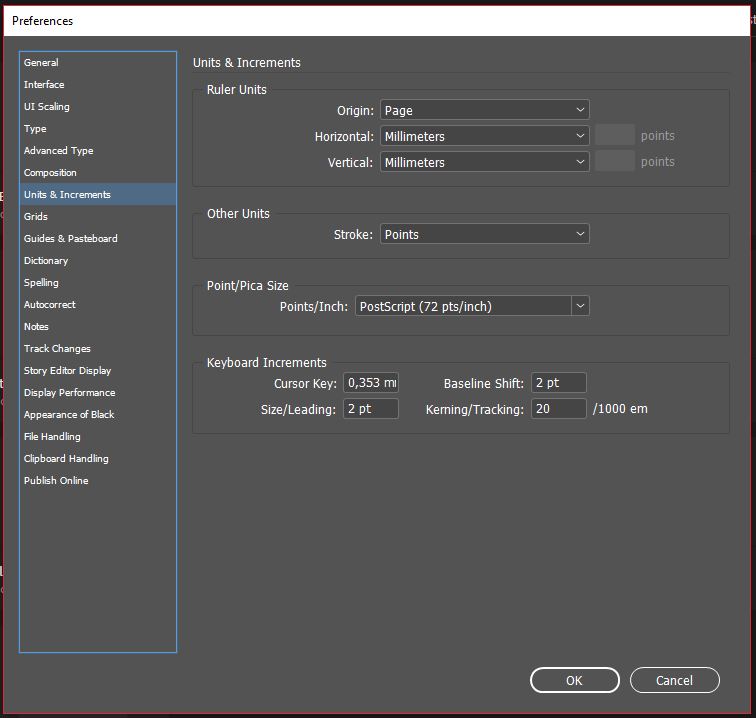
Units&Increments
InDesign -> Edit -> Preferences -> Units&Increments
Origin - Page
Horizontal - Milimeters
Vertical - Milimeters
Stroke - Points
Points/Inch - PostScript (72 pts/Inch)
Keyboard Increments - Leave it on default or you can change it later according to the grid size
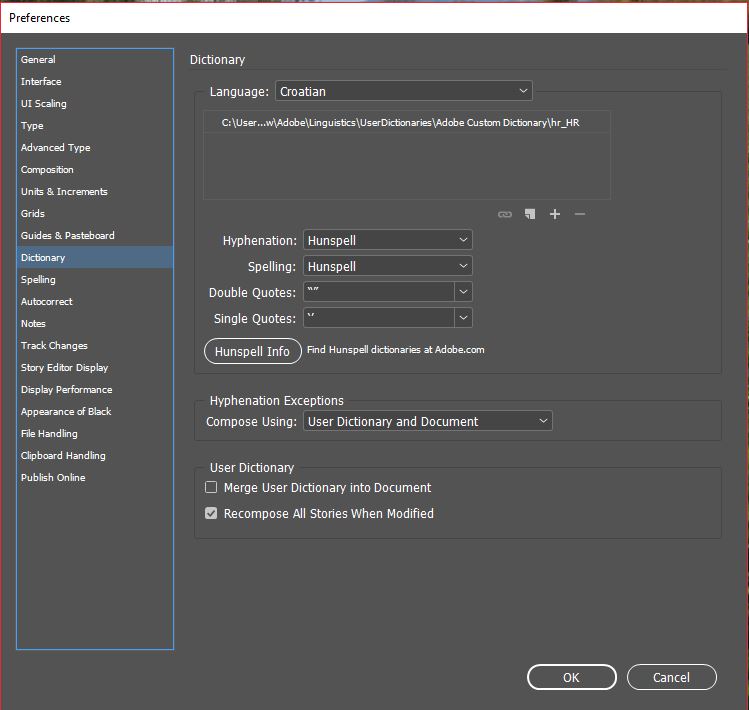
Language/Dictionary
InDesign -> Edit -> Preferences -> Dictionary
Language - Define working language
Hyphenation - Hunspell (InDesign uses Hunspell dictionaries for most languages to verify spelling and to hyphenate words.)
Spelling - Hunspell
Double quotes/Single quotes - InDesign has the ability to automatically change the type of quotation versus appearance in the text editor. If the quote marks are not displayed in accordance with the defined layout, here you can adjust them later.
Hyphenation Exceptions - Compose using - User Dictionary and document
User dictionary - Recompose All Stories When Modified
Layout
Za kreiranje predloška potrebno je definirati format publikacije zajedno sa osnovnim elementima.
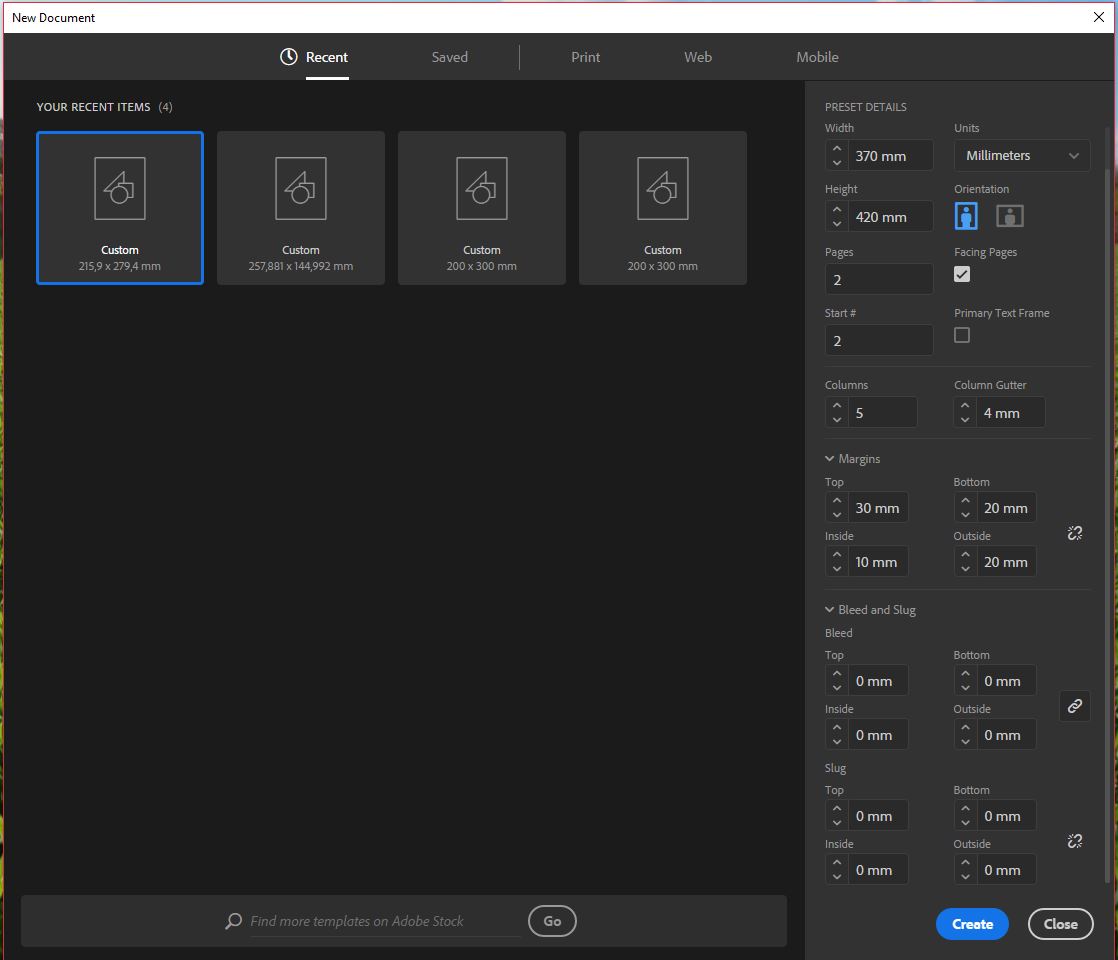
Document format
InDesign -> File -> New document
Width - mm
Height - mm
Orientation - up
Pages - 2
Start page - 2
Columns - number of the columns
Column gutter - gutter between the columns
Margine
Top - top
Bottom - bottom
Inside - inside
Outside - outside
Bleed and slug
Bleed - bleed is printing that goes beyond the edge of where the sheet will be trimmed
Slug - slug is usually non-printing Information such as a title and date used to identify a document.
Create
Save document
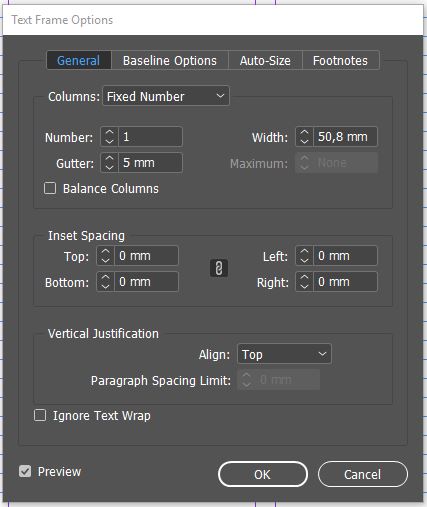
During a layout, sometimes you will add elements and need to define the number of columns in the text box. Since InDesign's basic measure for the distance between the columns is 4,233 mm, you will need to manually change it. Therefore, it is simpler to change the master definition to the one defined in the layout design.
Object -> Text Frame Options -> General -> Gutter -> Correct measurement
Main grid definition
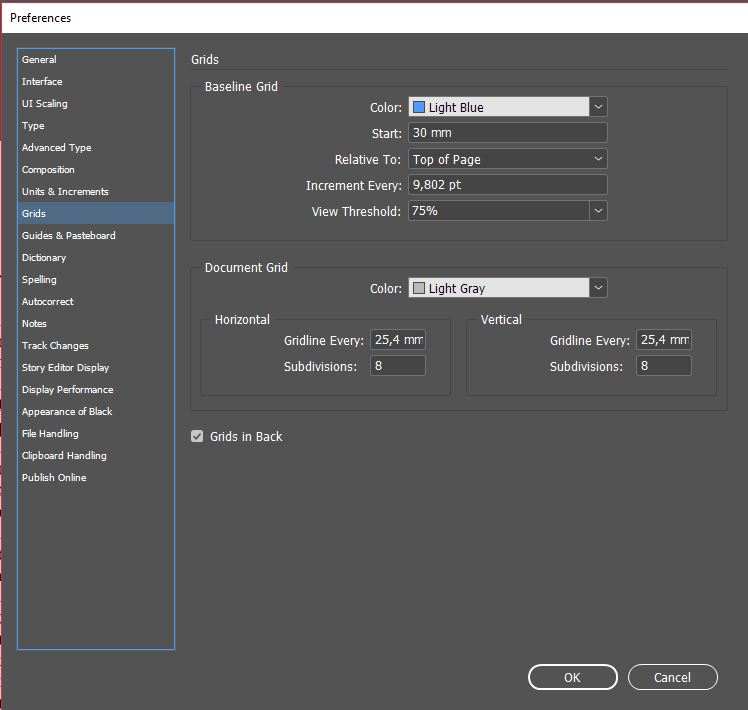
InDesign -> Edit -> Preferences -> Grids
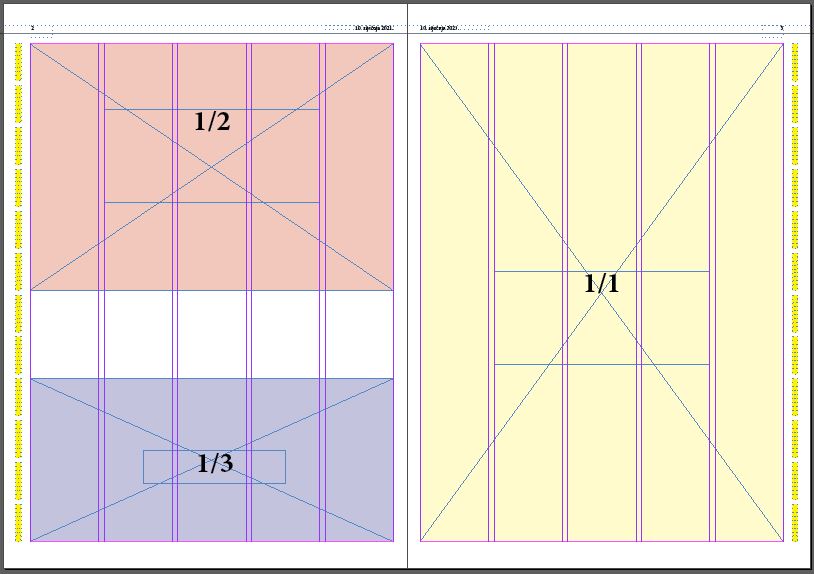
The next step is to create a grid that will match body text and ad formats. The size of the grid depends on the format of the publication, the number of grids depends on the ad formats. The goal is to have both parameters connected and functional.
Eg. for publication format 300x420 mm and a text block size of 270x370 mm. The most common ad formats are 1/1, 1/2, 1/3, 1/4, so the page by height should be split so that most of the formats are sitting on their grid. Such drafting allows us to customize the size of texts in template preparation with the most common formats, which makes it easy to work with ads.
In this example, there are 107 grids (12 / yellow/modules with 8 grids and 11 grid spaces) with a spacing of 9.802 pt. Divide the text block height of the page with the number of grids and enter the measure taken into the Preferences starting from the top of the page and the height at which the book block begins.
Now import body text and see if grid size compatible with text leading in body text.
In this example the text size is 9pt and the leading of 9,802 pt corresponds to both the size of the text and the type of font that varies from publication to publication.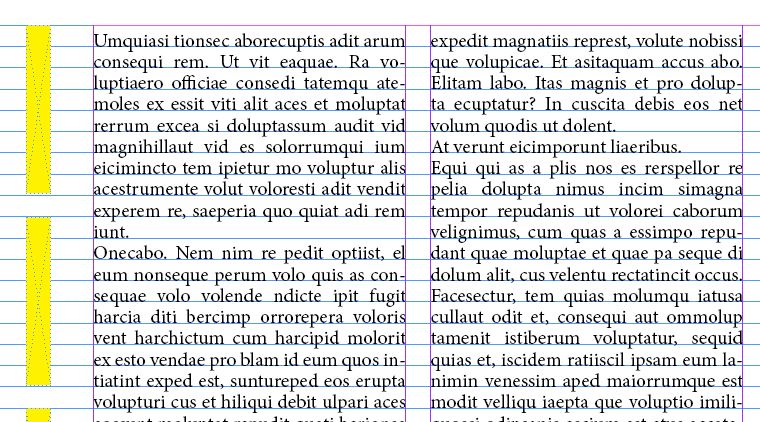
Remark - If this calculated leading does not match the size and type of font used in the body text, try reducing/increasing it by changing the margins (for newspaper layouts be careful with the minimum margin size defined by the press) and the number of grids (e.g. division into 95 grids (1 module 7 grids) gives us a leading of 11.1 pt) but certainly try to keep the basic division on the 12 rows of the grid as in the example.
Maste page definition
InDesign -> Window -> Pages -> A-Master
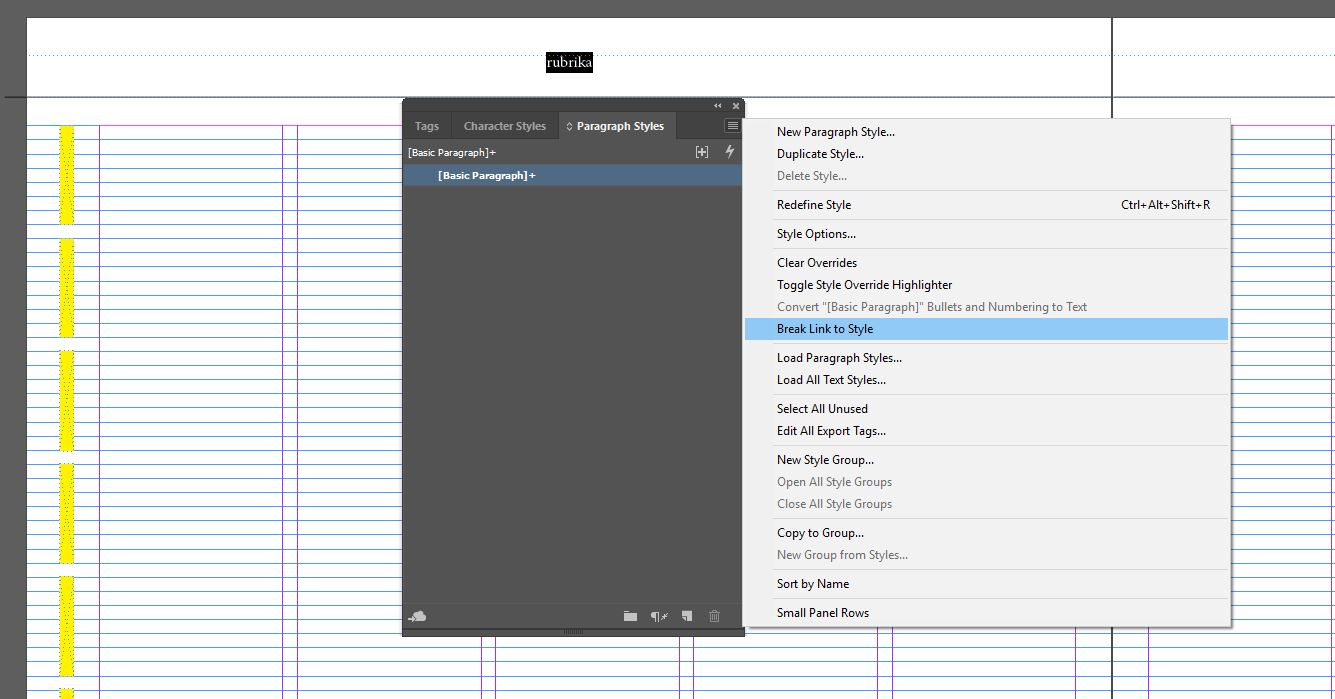
Now set the yellow (color is optional) modules on the basic A master and define non-printing objects (Window -> Output -> Attributes -> Nonprinting) and all the header and footer elements (page numbers, logos, sections, date. ..). Define font, size, variations, and nested or grep styles for all elements that consist of multiple fonts/variations (eg Monday, January 22, 2019).
For elements without additional formatting, paragraph styles are not required and there is no need to create an additional style but through the 'break link to style' option (Select text -> Paragraph styles -> Top menu up-> Break link to style) define the font and size of that element without creating a paragraph style..
Now all elements need to be properly tagged to fill in the necessary information at the time they are opened.
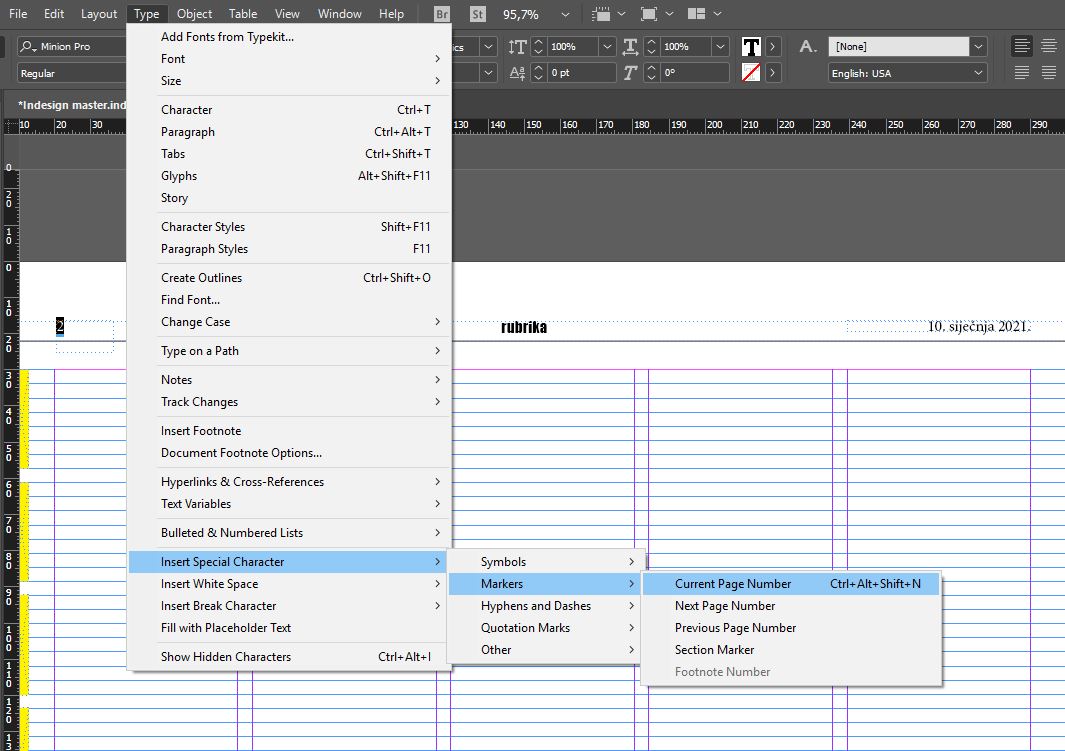
The page numbers are defined by the 'insert special character' option (Select Text -> Type -> Insert Special Character -> Markers -> Current Page Number). The page number will change to A (A master, on B master the label will be B, on C master C...).
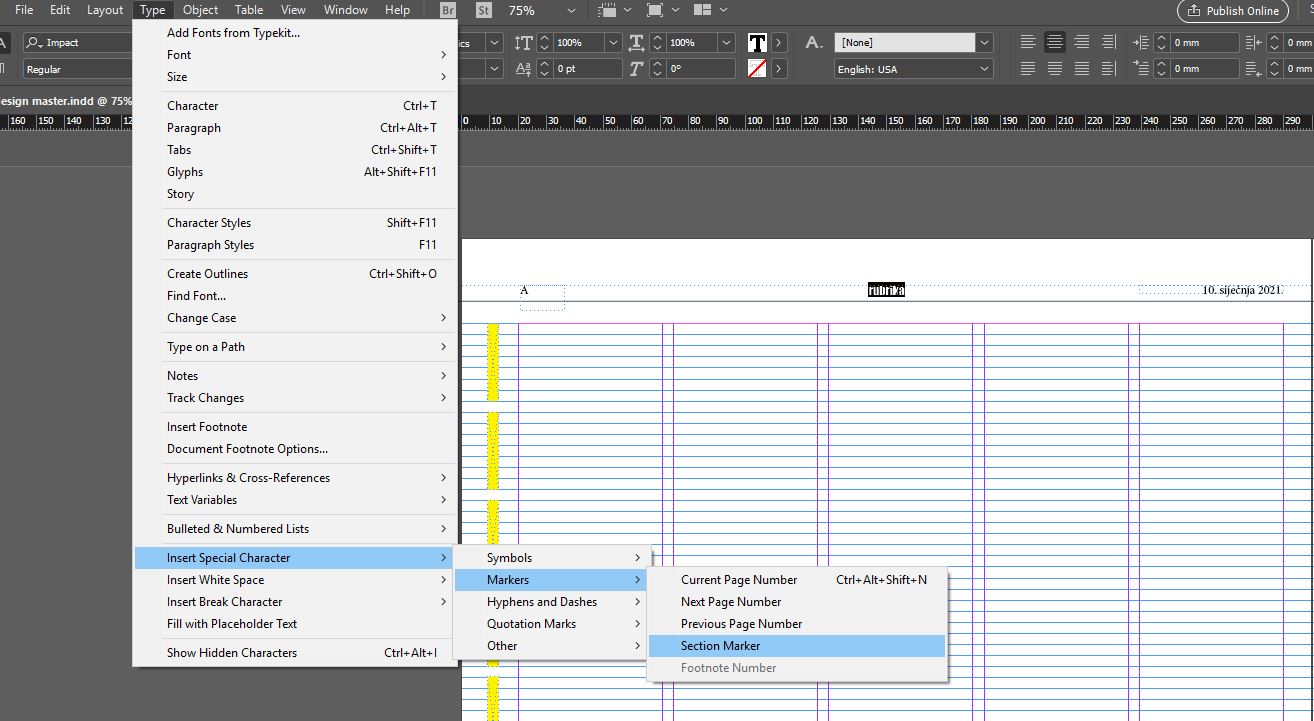
We define the section data (e.g. interview, books, world news...) through the 'section' option. (Select Text -> Type -> Insert Special Character -> Markers -> Section Marker). After selection, the selected text will automatically change to 'Section' and will not be seen on the blank_template first page..
Window -> Utilities -> Tags
With section StoryEditor has the option of using tag 'Subject', which is especially useful for magazine columns that are not permanent but are changed from number to number.
The section tag is defined by the 'section tag' that will be automatically created later when submitting the template to the database so tagging this element will be described later.
The date is defined through the 'date tag' that will be automatically created later when submitting the template to the database so tagging this element will be described later.
Layout defining
Paragraf styles
Window -> Styles -> Paragraph styles
Paragraph Styles allow you to define all typographic parameters (font types, font size, kerning, leading, nested, grep styles, colors ...) within an element. The element with a properly defined style / styles at the layouting will automatically be placed on the page as we want. This makes it easier for graphic artists, but we also ensure the uniformity of layouted elements.
StoryEditor has the ability to use SE paragraph styles, object styles, but it also allows the work and 'next style' options when placing articles on a page.
What and how SE paragraph styles work and how to define look at ...
Next styles are applied automatically when placing text on the page and remain applied after linking the article. They are useful in elements that appear once and always follow the same elements.
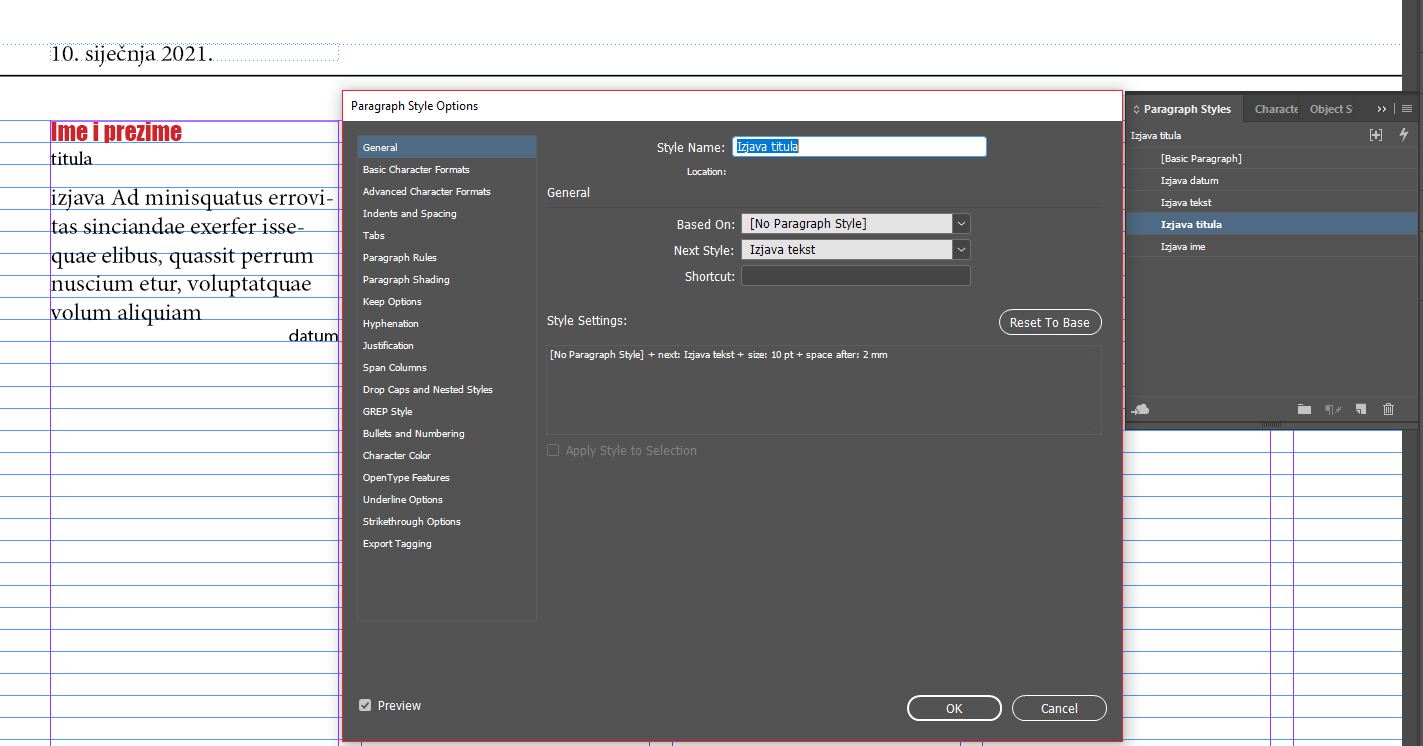
An example of a person's statement within an article
Style 1 - Name and Surname (Ime i prezime)
Style 2 - title (titula)
Style 3 - statement (izjava)
Style 4 - Date
In this example, within each paragraph style in the next style option we define the following style.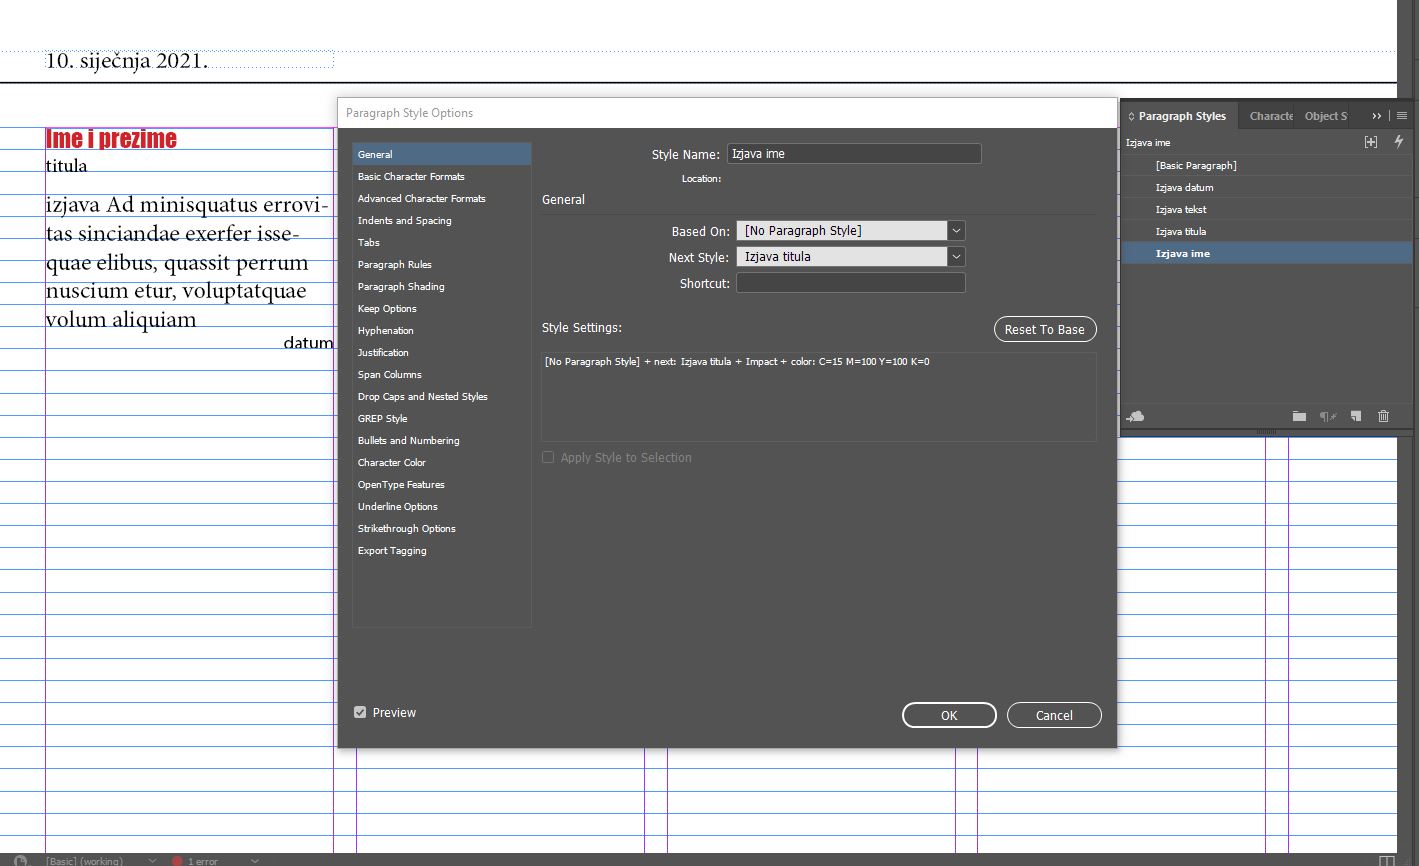
We can also use the next styles in:
- the first paragraph of the text has the initials and body text follows it (in the paragraph style of the initials we say that the next style is body text)
- the first paragraph behind the inter-title is unindented (in the inter-title we define that the next style is without the indent, the style 'without the indent' we define the next style is 'body text' ...)
Note - It is essential that all paragraph styles are 'clean' (for example, that the style 'title of the box' is not edited body text style, you must create a new paragraph style).
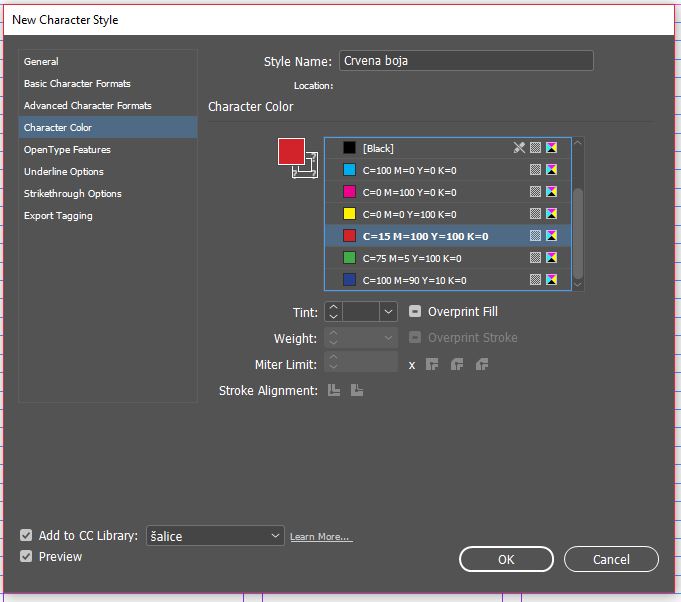
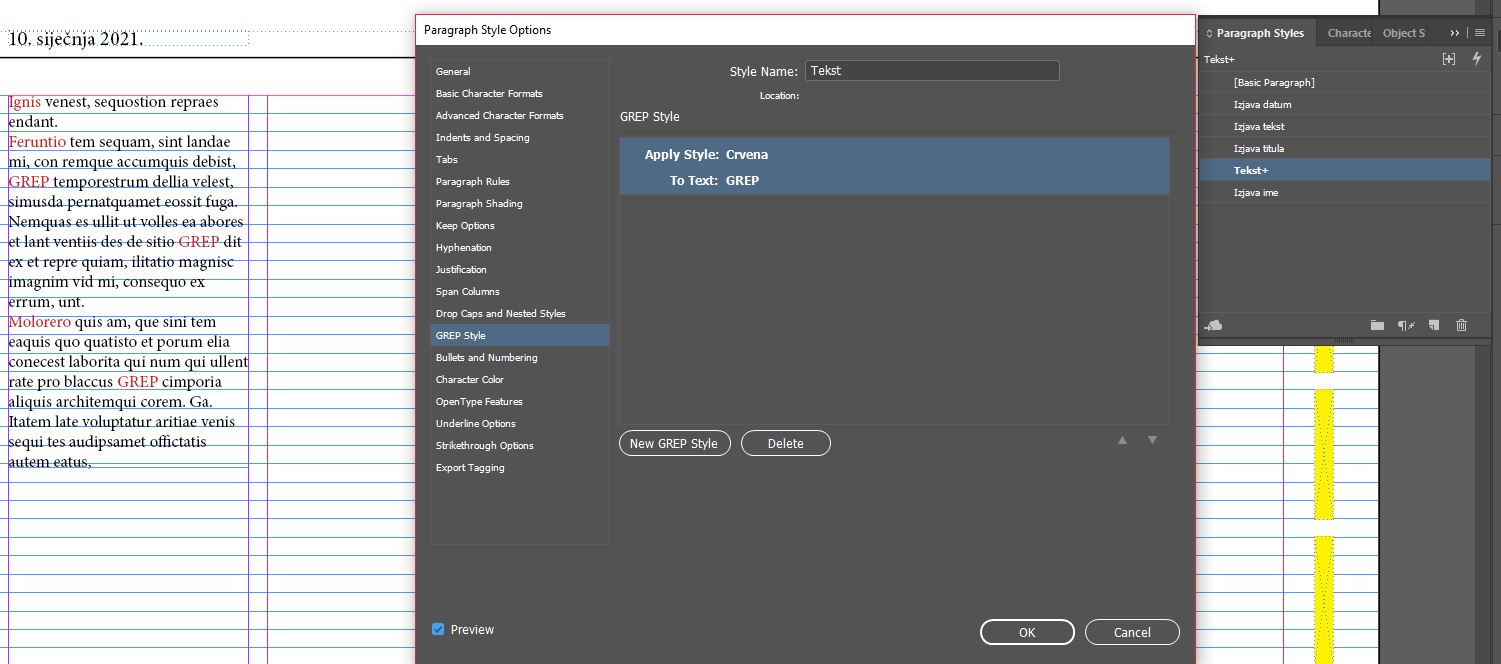
Character styles
Window -> Styles -> Character styles
Character styles allow you to work with different font variations in StoryEditor (SE-italic, SE-bold, SE-bold-italic), but we also use them to create nested and grep styles...
Eg. In nested styles, among other things, we can define that the first word in the paragraph always has an applied character style that applies a red color to the text.
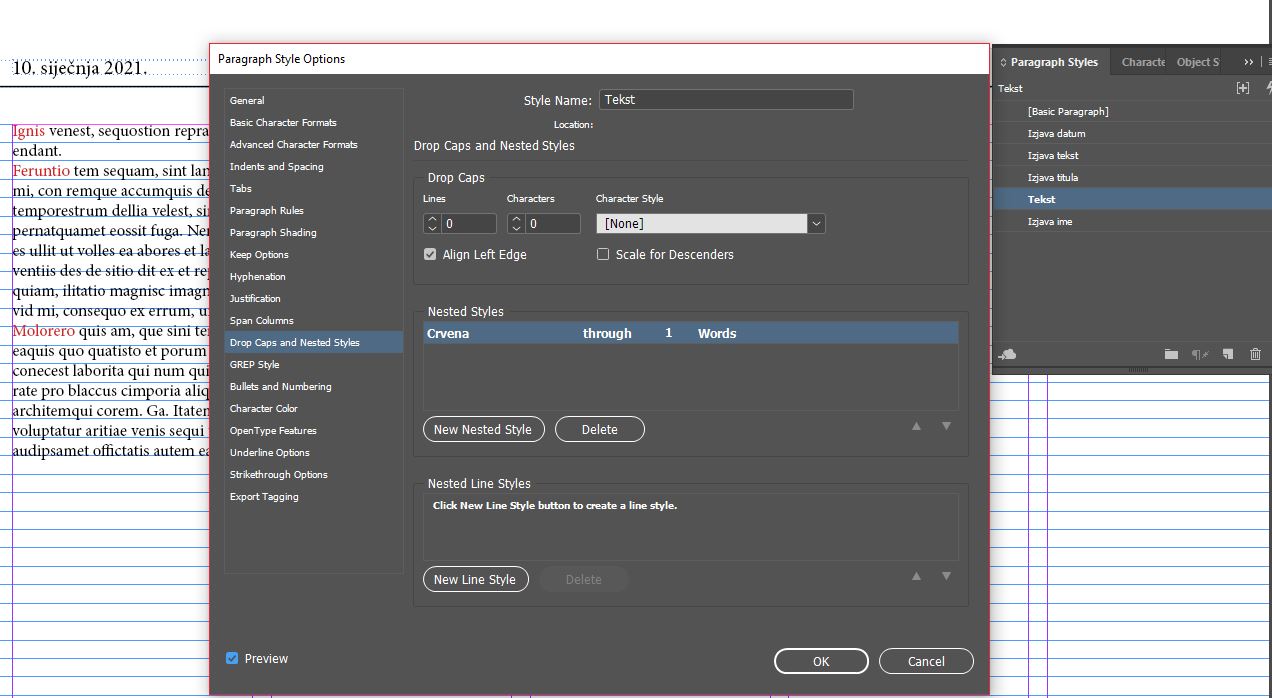
With grep styles we can define that the word GREP always has a applied character style.
Object styles
Window -> Styles -> Object styles
Object styles allow elements like photos, backgrounds... to retain shape (outline, color, column number) even after applying photo/text.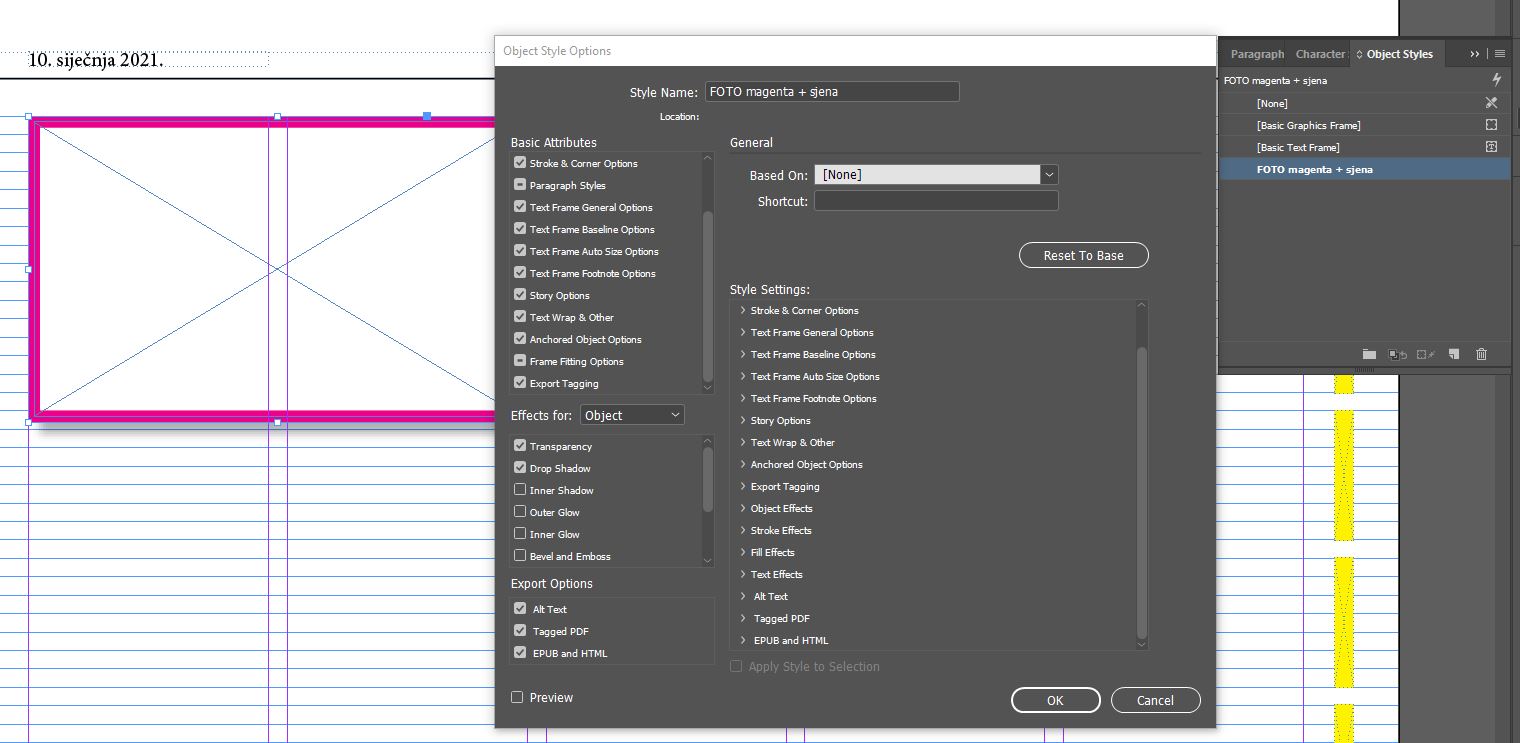
Master boje
Window -> Color -> Swatches
Most publications use specifit color range in layouting. Additionally some publications connect a certain color to a particular section.
If you use exactly the same colors, you have to define them on the master because it will appear on all pages of specific edition so that they will always use the same shades.
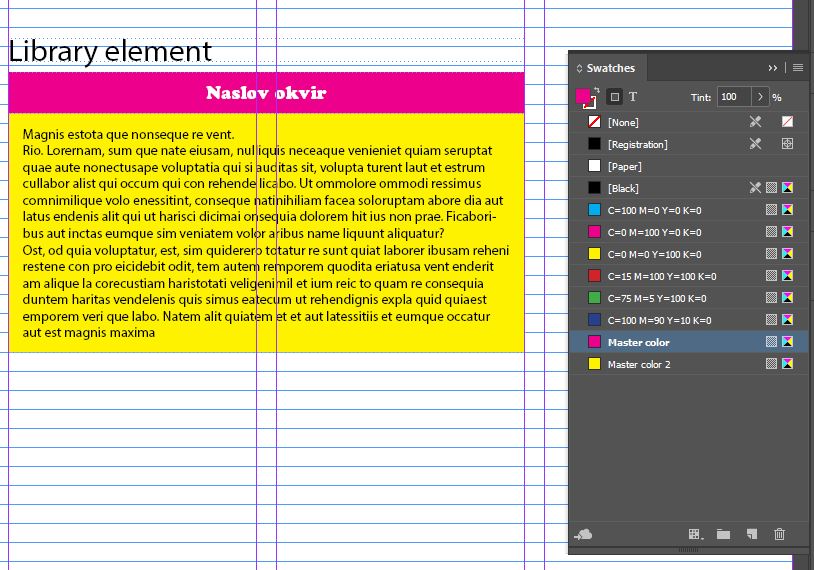
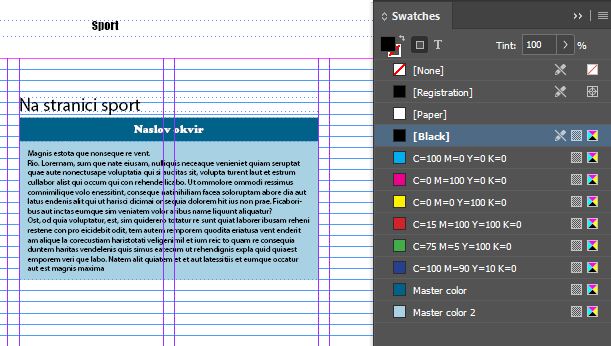
For colors related to a particular section, StoryEditor uses the Master color and Master color 2 options that are defined when making the columns in SE (see section ...) and applied to the element during the layouting. For this reason, we only save one version of the element (eg box), not color variations (eg a blue sports box, orange culture box ...).
On the master page in Master color and Master color 2 we pre-define two neutral colors that are not used in the columns (they will automatically change to the right color when positioning on a page within a particular section).
Example:
The sports box in the box uses two shades of blue. These two shades are not defined in the Swatches but through the color of the section (Section color), and they will be applied to the position element on the page.
Library
File -> New -> Library -> Save
Since the StoryEditor use elements that need to be labeled (see ....) it is faster and easier to pre-fabricate the elements ('ready to layout') and use them as needed.
Therefore, all the elements of the layout (just like any paragraph, object or character styles) must be prepared before starting work.
Prepare all elements (boxes, covers, quotes, finished articles ...), see if all the used paragraph styles are 'clean' and properly defined, label them and categorise in one or more different libraries (eg elements - for covers, quotes, frames ... articles - for articles of different sizes ... headlines - for article headlines).
Note - The items you store in the library should not be grouped because the system will not be able to read them while working.
If you've all been prepared, go to the next step - create a blank template (blank_template)
https://support.domenacom.hr/kb/faq.php?id=63