
 Hrvatski (Hrvatska)
 Create new publication
Create new publication
StoryEditor
Step 1 - Basic settings
SE -> Admin -> Admin Publication -> Publications -> Create New Publication
We select ‘Create new publication’ in ‘Publications’ menu to define parameters of publication.
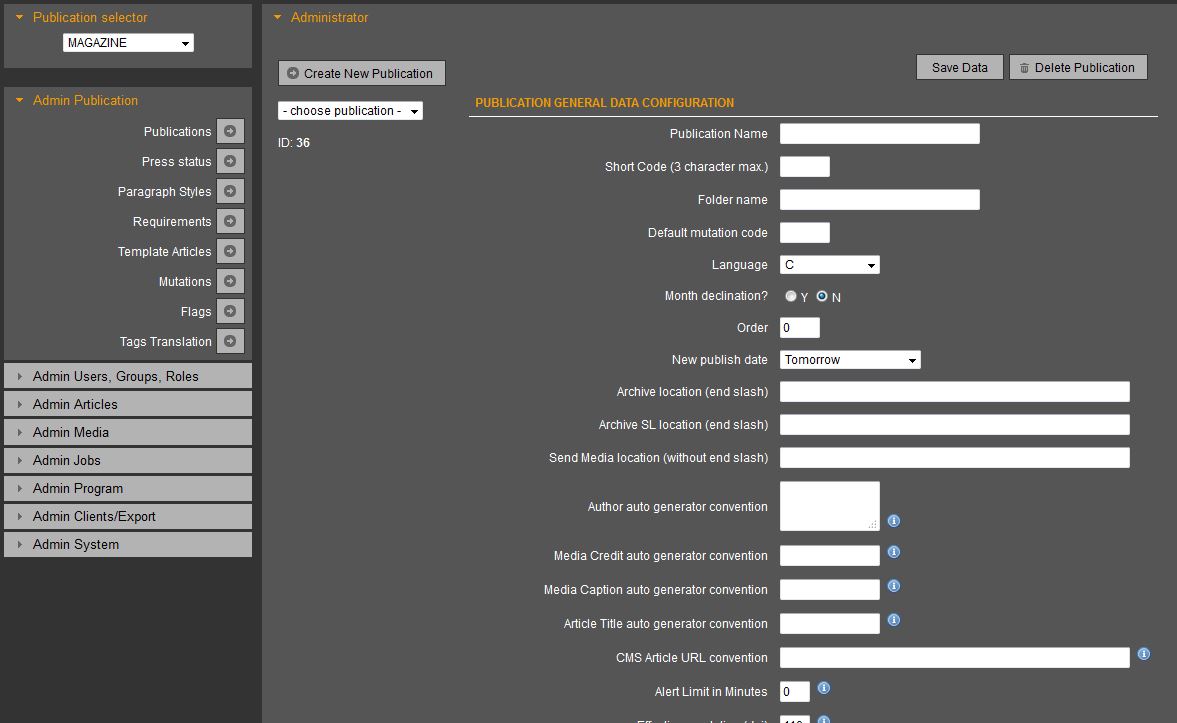
PUBLICATION GENERAL DATA CONFIGURATION
Publication Name - name of the publication, e.g. Magazine
Short Code (3 character max.) - shortened name, e.g. MAG
Folder name - you don’t create the name of the folder, it is created by default within the base
Default mutation code - label that marks version of mutations, it is used when creating PDF files, e.g. 2 (second edition)
Language - default language format for a certain publication
Month declination - defines whether names of the months will be declined (according to specific grammar)
Order - Order of publications in a dropdown menu when sending articles from one publication to the other
New publish date - basic publish date being used to create new articles
Archive location (end slash) - defines the location where StoryEditor will transfer all files of pages when archiving, path as Linux server sees it
Archive SL location (end slash) - defines the location for StoryLink to be able to open the archived files, path as Windows client computer sees it
Send Media location (without end slash) - defines location for sending photos to processing in Media processing
Author auto generator convention Defines automatic generation of author’s name as it will appear with an article. Display mode is defined through menu that opens by clicking the icon ‘I’.
{FN} - Name
{LN} - Last name
{ii} - Initials
{EM} - e-mail
Media Credit auto generator convention Defines automatic generation of photographer’s name as it will appear with photo. Display mode is defined through additional menu.
{AT} Author (All Caps) - NAME AND LAST NAME
{CR} Credit (All Caps) - Agency
{At} Author (Title Caps) - Name and Last Name
{Cr} Credit (Title Caps) - Agency
{at} Author (Small Caps) - Name and Last name
{cr} Credit (Small Caps) - Agency
Media Caption auto generator convention Defines automatic generation of signature under the photo.
{C} Caption Signature under the photo
{AT}Author (All Caps) - NAME AND LAST NAME
{CR} Credit (All Caps) - AGENCY
{At} Author (Title Caps) - Name and Last Name
{Cr} Credit (Title Caps) - Agency
{at} Author (Small Caps) - Name and Last name
{cr} Credit (Small Caps) - Agency
Article Title auto generator convention Defines automatic generation of articles’ working title
{T} Title - Title
{MM} Publish date - Month (06)
{DDDD} Publish date - Day (Thursday)
{DD} Publish date - Day (23)
{YY} Publish date - Year (98)
{YYYY} Publish date - Year (1998)
{P}Page - page
{I} Issue - issue/edition
{PROJ} Project name - Project name
E.G. for the article named Working that will be published on June 23rd for project named Today, sequence looks as follows
{DD}_{MM}_{PROJ}_{T}
And it will be shown in StoryEditor:
23_6_Today_Working
CMS Article URL convention
Defines link for display of the article on web portal, with articles that are sent to web, there is External link option on the left side.
By clicking this option, new window will open and you will see article published on web.
{cmsID} article -cms ID - ID of the article in case when identification numbers of CMS are used on portal
{seID} article storyeditor ID - ID of the article in case when identification numbers of StoryEditor are used on portal
Article Details iFrame URL
Defines iFrame window within the article where you can, for example, list the statistics of the article published on the web
iFrame window is on the left side of the article under External link option.
Article Details iFrame Height - defining height of the iFrame in which you list the statistics of the article published on the web.
Alert Limit in Minutes - defines the time in minutes when the alarm will start warning which project is coming to a deadline. (background of the pages will turn red)
Effective resolution (dpi) - minimal effective resolution of the photos that StoryLink will mark as too low (e.g. if you put 300 dpi as minimal, SL will alert you on all photos that are under 299 dpi)
Target resolution (dpi) - optimal resolution that Photoshop will use to calculate resizing of photos during process
Ads Fitting Options - StoryLink options for placing an ad into a frame during automatic insertion of ads on InDesign page
- Center Content - the ad will be centered inside the frame
- Fit Content Proportionally - the ad will be adjusted to frame proportionally (width and height) if they are not the same size
- Fit Content To Frame - fits content to specific frame that is set in advance the ad will ‘forcefully’ be adjusted to frame (width and height) so distorsions are possible
Backup .indd files on locals? - defines if you want to make backup copy for InDesign documents on your computer
Backup duration in days - defines the number of days that you wish the backup copy to be saved on computer, after which it will be automatically deleted in order to save computer space
Publication Logo (.jpg only) - with this option you upload the logo of the publication in .jpeg format, to be used when printing global from Press module
ARCHIVE CONFIGURATION
DELETE .indd Files (when archive project) Y N - defines the automatic deletion of Indesign files after the archiving of the edition
DELETE .pdf Files (when archive project) Y N - defines the automatic deletion of PDF files after the archiving of the edition (preview PDF for display of pages in Press module)
DELETE .jpg Files (when archive project) Y N - defines the automatic deletion of .jpg files after the archiving of the edition. (big preview of pages in Press module)
DELETE _mi.jpg Files (when archive project) Y N - defines the automatic deletion of .jpg files after the archiving of the edition. (middle preview of pages in Press module)
DELETE Links/Articles Folder (when archive project) Y N - defines the automatic deletion of the map with links to articles after the archiving of the edition
DELETE Links/Media Folder (when archive project) Y N - defines the automatic deletion of the folder with links to photos after the archiving of the edition
PITSTOP CONFIGURATION
DELETE ALL Files from Pitstop (when archive project) Y N - defines automatic deleting of all files from ‘Pitstop’ after the archiving of the edition
Absolute Pitstop ROOT location (with ending slash) - defines location of Pitstop folder
Copy to Pitstop (with Publish from StoryLink) Y N - copying files into Pitstop folder when creating PDF files for press in StoryLink (by clicking Publish in SL, files will automatically be copied to Pitstop folder)
Absolute Pitstop input location (with ending slash) - the location where the PDF for quality control will be sent to
Absolute Pitstop error location (with ending slash) - the location where the PDF with an error will be saved
Absolute Pitstop success location (with ending slash) - the location where the correct PDF will be saved
Relative Pitstop error location (with ending slash) - the location where the PDF with an error will be saved (a relative path used if the location is on some other web server)
Relative Pitstop success location (with ending slash) - the location where the correct PDF will be saved (a relative path that is used if the location is on some other web server)
PDFs CONFIGURATION
Publish PDF Name Convention Defining name of PDF file when publishing pages in StoryLink
{I} Issue - issue
{U} Mutation - shortened code of mutation
{PP} Absolute page no. 2 spaces - absolute number of pages using 2 digits
{PPP} Absolute page no. 3 spaces - absolute number of pages using 3 digits
{YY} Year 2 spaces - year written using 2 digits
{YYYY} Year 4 spaces - year written using 4 digits
{MM} Month - month
{DD} Day - day
{CPT} Color page type - Color page type (in color or black and white)
PDF Name Convention for Output Defining name of PDF file when sending pages to press through StoryEditor
{I} Issue - issue
{U} Mutation - shortened code of mutation
{PP} Absolute page no. 2 spaces - absolute number of pages using 2 digits
{PPP} Absolute page no. 3 spaces - absolute number of pages using 3 digits
{YY} Year 2 spaces - year written using 2 digits
{YYYY} Year 4 spaces - year written using 4 digits
{MM} Month - month
{DD} Day - day
{CPT} Color page type - color of page type (in color or black and white)
{V} Version - 1 space (FTP only) automatically printing PDF version of file sent to print (one digit)
{VV} Version - 2 spaces (FTP only) automatically printing PDF version of file sent to print (two digits)
Choose correct date for PDF Name (publish date / page date) - Defines which date will be generated when creating PDF files (date of creating PDF or date of publishing the publication).
InDesign PDF Preset for PRESS Pdfs - Defines the names of preset settings for creating the PDF files for press (.joboptions file that was integrated to inDesign, provided by press).
InDesign PDF Preset for WEB Pdfs - Defines the names of preset settings for creating the PDF files for publishing on web (.joboptions file that was integrated to inDesign).
PROOF Output Configuration (Sending PDFs for Proofing) - Sending PDF files for proofing before press.
Type (none/folder/ftp) - select whether the files will be sent to a local folder or through ftp
PROOF Folder - if a local folder was selected, here you will enter the absolute path to that folder here
PROOF FTP Host - if ftp was selected, you will enter the address of the ftp folder here
PROOF FTP User - the username for connecting to ftp
PROOF FTP Pass - the password for connecting to ftp
PROOF Versioning Y N - options for writing versions in PDF file names (YES or NO)
PRESS Output Configuration (Sending PDFs to Press company) - Sending the PDF files to press
Type (none/folder/FTP) - send the documents to a local folder or through ftp
PRESS Folder - if a local folder was selected, you will enter the absolute path to that folder here
PRESS FTP Host - if ftp was selected, you will enter the address of ftp folder here
PRESS FTP User - the username for connecting to ftp
PRESS FTP Pass - the password for connecting to ftp
PRESS Versioning Y N - options for writing versions in PDF file names (YES or NO)
SEND ARTICLE TO WEB CONFIGURATION
A configuration of sending the articles to the web. Option “Publish to web” in Articles module will send articles as XML files joined with photos in compressed format (.zip)
Type none (download)/folder/ftp/push - select the type of sending (manually to a local computer / local folder on server / ftp folder / automatic sending to web by script)
WEB Folder - absolute path to the folder where the article with the photos will be sent
WEB FTP Host - ftp address
WEB FTP User - the username for connecting to ftp
WEB FTP Pass - the password for connecting to ftp
WEB FTP Folder - selection of the folder at the previously defined ftp address
WEB Push Script - path to the script that will automatically open the .zip file and publish the sent article web
{X}Article XML-ZIP File
{AID}Article ID
Get Push Script Response Y N - select whether you want to show the message created by the script after sending article to web or not
SEND BLOCK TO iPAD CONFIGURATION
Option to send blocks of pages to iPad (used in Press module - Block Preview type)
Type none (download)/folder/ftp/push - select type of sending (manual saving to a local computer / local folder on server / ftp folder / automatic sending to iPAD using script)
iPAD Folder - absolute path to the folder where blocks of pages will be sent
iPAD FTP Host - ftp address
iPAD FTP User - the username for connecting to ftp
iPAD FTP Pass - the password for connecting to ftp
iPAD Push Script - address to script that will automatically open .zip file and publish sent article on iPad device
Step 2 - Define the Press status
SE -> Admin -> Admin Publication -> Press layout status
Within ‘Press status’ menu you define the different stages of work (statuses) that the pages are currently in.
As seen from this example, pages that haven’t been worked on are labeled FRE (and have specific coloring), pages that are being worked on have the status WRK (this change occurs automatically once the document has been opened), pages that are ready RDY (ready for the editor to proof), AUT (authorized by the editor), PDF (created the PDF files for the press), FTP (sent to the press).
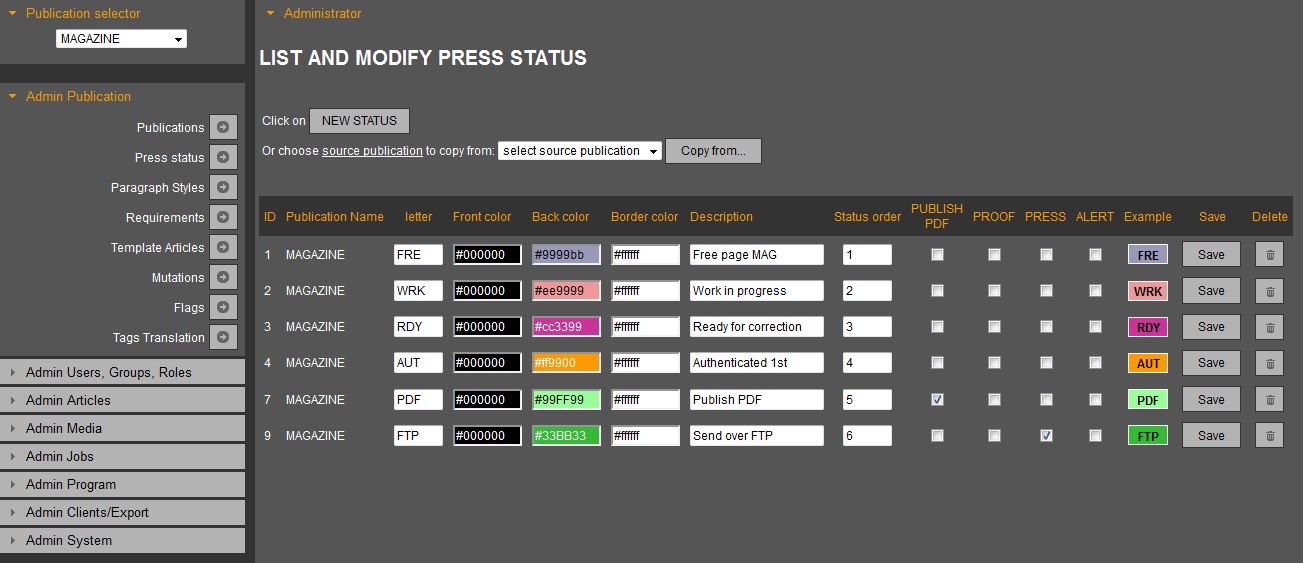
Statuses are adjusted to individual needs of users for easier work with SE editorial system, at the same time easy labels are helpful to all users to see different stages of work on certain pages.
Press statuses can be created by clicking to ‘New status’, or copied from an existing, previously defined publication.
Publish PDF column here you mark status that StoryLink will assign to page when you click Publish
PROOF column here you mark which status will be assigned to the page when sent to proof (Press / Output / To Proof)
PRESS column here we mark which status will be assigned to the page when sent to press (Press / Output / To Press). This means that if you check FTP status when in To Press menu, pages in status the PDF will show “To Press” button that you can click
ALERT marks the status that will turn off the warning for pages near last deadline (red background of pages)
Step 3 - Define the status of the article
SE -> Admin -> Admin Articles -> Article Status Config
Use this menu to define statuses of articles depending on workflow, so users (especially editors and graphic designers) can easily track articles through all work stages (e.g. Input - article is still in the works, Editing - article is ready for editor to view, Proofreading - ready for proofreading, Ready - article is ready for layouting...). depending on the color of an article, a graphic designer in StoryLink will know if it is ready for layouting).
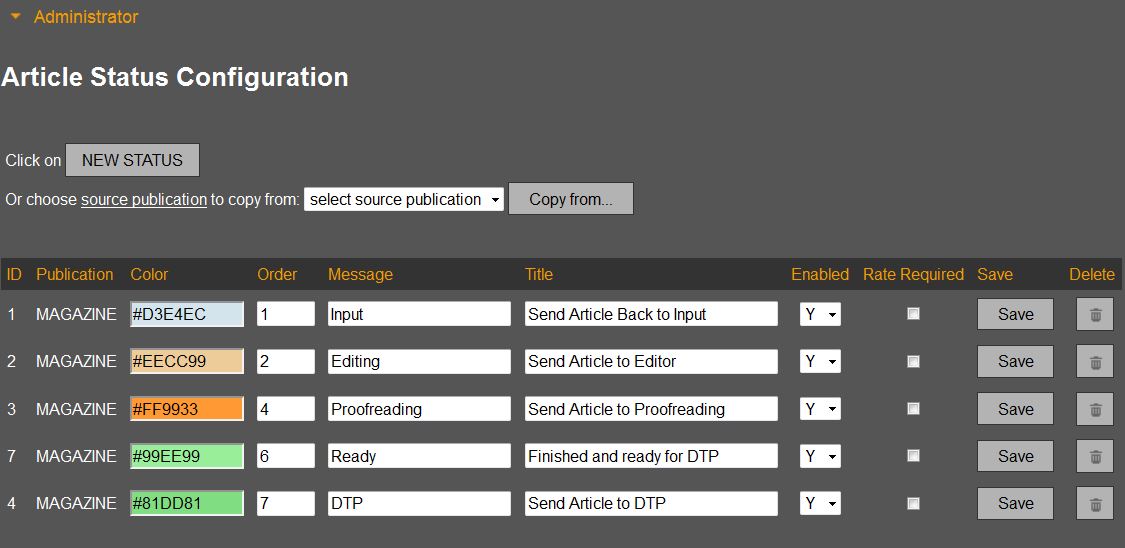
Statuses are also labeled with specific colouring that help working with the article (for instance, a graphic designer can, inside StoryLink interface, tell by the colour of the article when it’s ready for the layouting).
Statuses can be copied, as well as majority of settings in StoryEditor, from existing issues or you can create new ones. They are adjusted to every client and his former workflow.
Step 4 - Define user group permissions for article status
SE -> Admin -> Admin Articles -> Article Status Action
Article Status Action defines the groups of users that can access an article at the certain stage of work. For example, proofreaders can not open the article that is still in the works (e.g. status input), journalists can not edit article in status of proofreading (e.g. status Proofreading)...
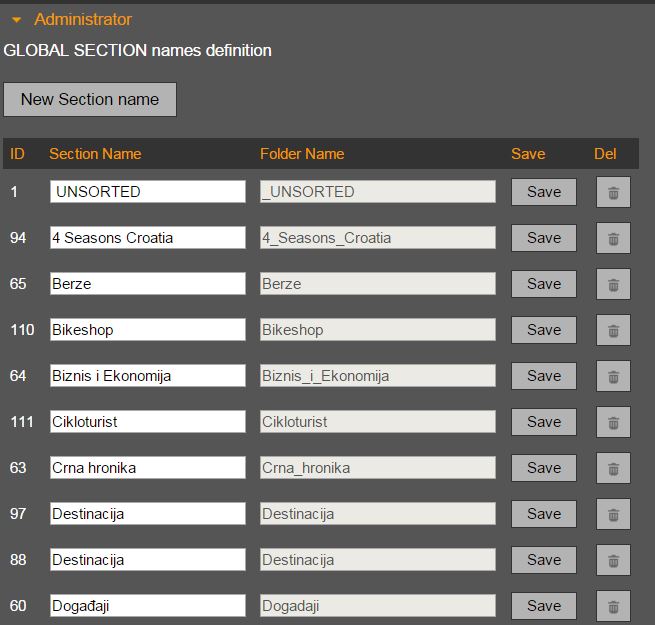
Step 5 - Enter the sections to the database
SE -> Admin -> Admin System -> Section names definition
Here you define sections that will be used in publications in all of the system. With New Article Sections in Admin Articles panel you define which section is used in which publication.
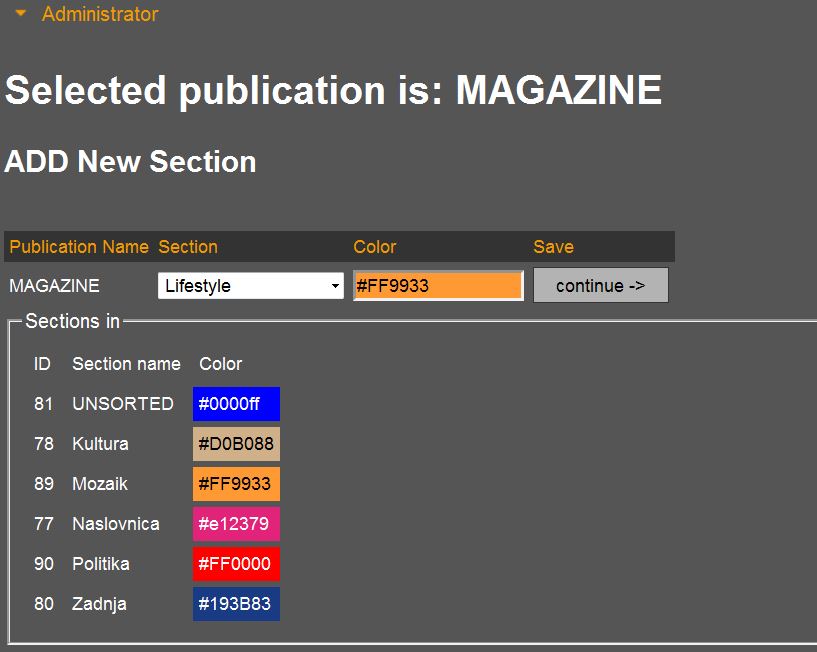
Step 6 - Define the sections within the publication
SE -> Admin -> Admin Articles -> New Article Sections
Use this menu to assign previously defined sections to a publication (see Admin System; Section names definition). Color of the section is defined, so that it allows for easier recognition of the original section.
Step 7 - Modify the sections within the publication
SE -> Admin -> Admin Articles -> Change/Del Article Sections
Use this menu to define two basic colors related to a section (e.g. elements of the Sports section can be two shades of blue). Here you define master 1 and master 2 colors which will automatically be shown when layouting (see defining elements for layout, InDesign).
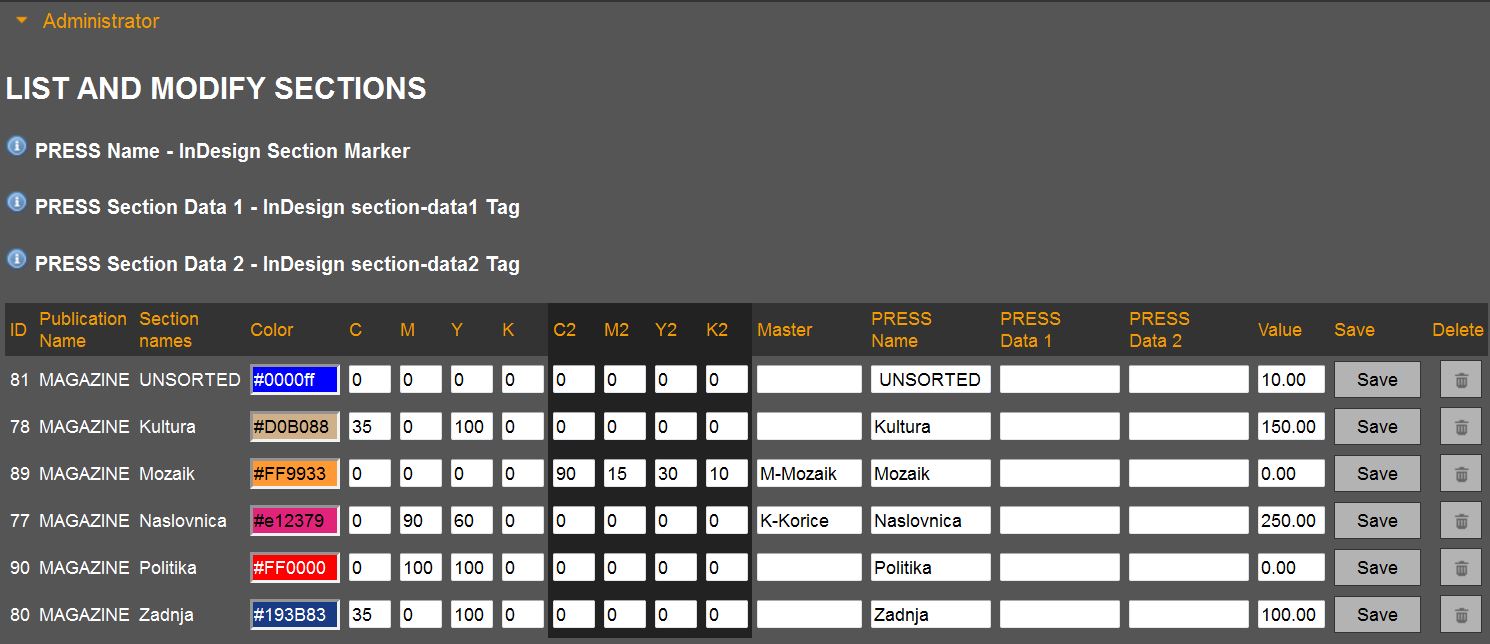
Also, here you define name of the master (defined in Indesign) you want to link to section (e.g. at the Mosaic section the page master for layouting appears with 6 columns, while for the covers the page master is with 1 column without paging). Name of the master must be the same as the name of the master used in InDesign.
Step 8 - Define infobox types
SE -> Admin -> Admin Articles -> Infobox types
Use this menu to define infobox types that will be used in publication (e.g. lead, quote, numbers...). Types will be shown when an article is created.
Step 9 - Define users/group/roles
- users to publication – define which user can work in the new publication
- users to press status – define which press status is user allowed to see/work
- users to section – define in which section user can see/edit articles
You can also define all of this thrue user premisions option.
Step 10 - Create blank template
See chapter Create the InDesign template
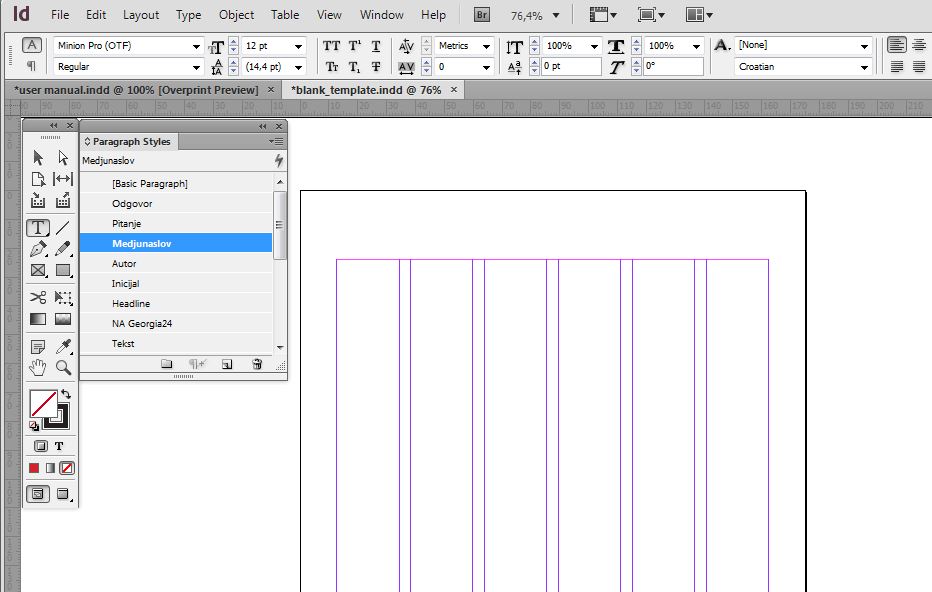
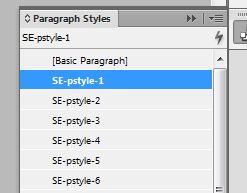
Step 11 - Define the Paragraph styles
SE -> Admin -> Admin Publication -> Paragraph styles
Paragraph styles (max. 6 styles) which are defined here are the styles that are shown in the article editor inside module Articles. Using those, journalists and editors define certain special elements inside the articles (e.g. initials at the beginning of the text, paragraph title, question for interview...) that were previously defined within Indesign document (Paragraph styles).
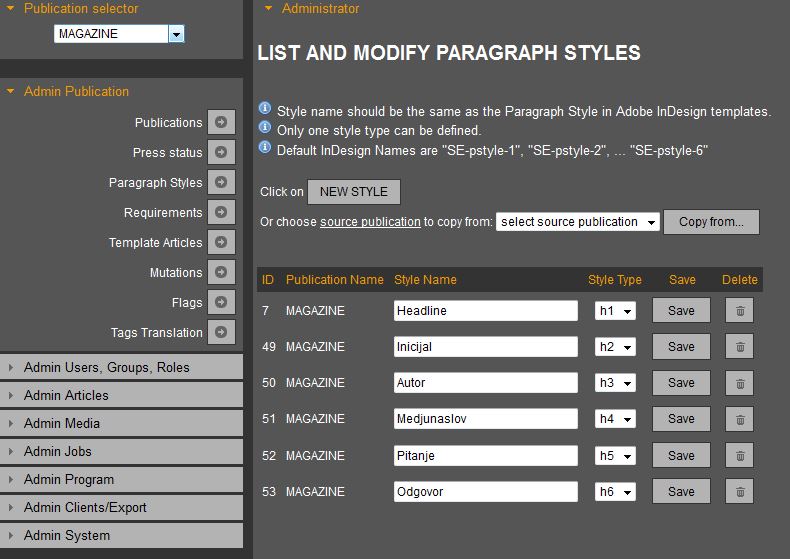
Paragraph styles can be created with ‘New style’ option, and can also be copied from existing issues. With Style Type option you define order that will be shown in Articles module.
It is important to notice that styles defined in Indesign must have the same name as those in StoryEditor. Otherwise the system will not be able to define them as same, and they will not be shown in the same way.
If you don’t define styles they will be shown in the Paragraph Styles palette inside InDesigna such as “SE-pstyle-1”, “SE-pstyle-2”, ... “SE-pstyle-6”
Step 12 - Define reference page in Ad module
Ads module -> Page formats -> New page format
When creating refrence page define:
Page Name & Type name and type of page
Type - type of page
As L / R / S(spread) - is it left, right or centerfold
Is this Reference Page? - is it the default page for ADS module - yes, you need first created page to be reference page
Orbituary Default? - is it the default page for Obituary module
Classified Default? - is it the default page for Class module
Margins (defined in InDesign as template page)
Top
Bottom
Inside
Outside
Columns Number of columns
Gutter - distance between the columns
Rows Number of rows
Gutter - space between rows
Page size Width and Height